Gutter Guard Installation: A Step-by-Step Guide

Stephen Griswell • February 13, 2026

Before you climb a ladder and start your gutter guard installation, it’s crucial to understand that a few common mistakes can lead to serious, expensive damage. For instance, did you know that attaching guards directly to your shingles can void your roof’s warranty? Or that improper alignment can cause water to sheet over the gutters instead of draining into them? This guide is your essential pre-project reading. We’ll walk you through the most frequent pitfalls homeowners face and show you how to avoid them. By learning how to properly prep, position, and secure your guards, you can ensure your project is a success.


CONTACT US


Key Takeaways

  • Prepare your gutters for success: Gutter guards can't fix existing problems, so always start by thoroughly cleaning your gutters, repairing any loose sections, and sealing leaks before you begin the installation.
  • Install correctly to protect your home: The most critical rule is to attach guards directly to the gutters, not your roof shingles. Puncturing your roof can cause serious leaks and may void your warranty, so always follow the manufacturer's instructions.
  • Keep your guards working with simple maintenance: Gutter guards are low-maintenance, not zero-maintenance. A quick rinse in the spring to clear pollen and a brush-off in the fall to remove leaves will keep water flowing freely and extend the life of your system.

Gutter Guards 101: What They Are & How They Work

Think of gutter guards as a protective shield for your home’s drainage system. They are specially designed covers that fit over your existing gutters to block leaves, twigs, pine needles, and other debris from getting in. At the same time, they have perforations or slots that allow rainwater to flow through freely and be directed away from your home's foundation. In short, gutter guards work by creating a barrier between the gunk that falls from your trees and the gutter channel itself. This simple but effective system is your first line of defense against clogs.

Without protection, your gutters can quickly fill with debris, turning into a heavy, waterlogged mess. This buildup prevents water from draining properly, forcing it to spill over the sides. That overflow can lead to stained siding, a damaged roofline, and even water seeping into your foundation, causing serious structural issues over time. Clogged gutters can also become a breeding ground for pests and a heavy, sagging hazard. Gutter guards are designed to prevent these problems before they start. By keeping the channel clear, they ensure your gutter system functions correctly, protecting your home from water damage and saving you from the constant, risky chore of climbing a ladder to clean them out. They are a smart addition to any home, providing peace of mind during every storm.

Common Types of Gutter Guards

Gutter guards aren't a one-size-fits-all solution. There are several different types, each designed to handle specific kinds of debris and weather conditions. The most common options you'll find are screen, reverse curve, and foam guards. Screen guards are essentially metal or plastic mesh that sits over the gutter, blocking larger debris. Reverse curve guards have a solid, curved top that uses surface tension to guide water into the gutter while debris slides off the edge. Foam guards are porous inserts that fit directly inside the gutter, allowing water to soak through while debris stays on top to be blown away by the wind.

The Top Benefits of Gutter Guards

So, are gutter guards really worth it? The benefits often speak for themselves. The most obvious advantage is reduced maintenance. You can say goodbye to spending your weekends perched on a ladder, scooping out handfuls of wet leaves. By keeping your gutters clear, guards also play a huge role in preventing water damage. Clogs cause water to overflow, which can damage your roof, siding, and foundation. Finally, they help extend the life of your gutters. The weight of wet debris can cause gutters to sag and pull away from your house. By preventing this buildup, guards reduce strain and help your system last longer, saving you money on costly repairs.

Your Gutter Guard Installation Checklist: Tools & Materials

Getting your tools and materials organized before you climb that ladder is one of the smartest things you can do. Think of it as your pre-project checklist. Having everything within reach not only makes the installation process smoother but also much safer. A little preparation on the ground saves you from making multiple trips up and down the ladder, letting you focus on getting the job done right. Let’s walk through exactly what you’ll need to gather for a successful gutter guard installation.

Essential Tools for the Job

First, let's talk tools. You don't need a professional-grade workshop, but a few key items are non-negotiable. The most important tool will be a reliable drill fitted with a 1/4-inch hex-head drill bit for driving in the screws that hold the guards in place. You’ll also want a sturdy pair of tin snips or a utility knife to cut the guards to fit the specific lengths of your gutters. A tape measure is essential for getting those cuts just right. If you find any loose sections while prepping, have a hammer on hand to secure any new or existing hangers before you begin.

Necessary Materials and Hardware

With your tools ready, it's time to gather your materials. The main item, of course, is the gutter guards themselves. It's important to choose a style that suits your home’s residential roofing system, the local climate, and the type of debris you get most often, like pine needles or large leaves. Most gutter guard kits come with the necessary hardware, which usually includes two types of screws: short 1/4-inch zip screws for a fast install and longer 1-inch screws for areas that need a more secure hold. If your gutters need reinforcement, you’ll also want to pick up some inside-fitting hangers to add stability before attaching the guards.

Safety Gear You Can't Skip

This is the most important part of your checklist. Working on a ladder requires your full attention, and the right safety gear makes all the difference. Start with a sturdy, reliable ladder. For extra stability, especially on soft or uneven ground, I highly recommend using a ladder standoff. You’ll also need a good pair of heavy-duty work gloves to protect your hands from the sharp edges of the guards and gutters. Finally, always wear safety glasses to shield your eyes from any small debris and sturdy, non-slip shoes to ensure you have a secure footing. Your safety is always the top priority, and if the job feels too big, it's always best to call a professional.

How to Prep Your Gutters for New Guards

Installing gutter guards is a fantastic step toward a lower-maintenance home, but before you jump into the installation, a little prep work goes a long way. Think of it this way: gutter guards are designed to keep clean gutters clean, not to fix existing problems. Placing a guard over a clogged, sagging, or damaged gutter system is a recipe for trouble. It can trap moisture and debris, potentially leading to bigger issues like fascia rot, water damage to your foundation, or even pest infestations. You're essentially putting a lid on a problem, which only makes it worse.

Taking the time to get your gutters in top shape first ensures your new guards can do their job effectively for years to come. A clean and sturdy foundation is key to a successful installation and the long-term health of your home’s exterior. This prep phase involves a thorough cleaning, a detailed inspection, and a few key repairs. By tackling these steps now, you’re setting your entire gutter system up for success and making sure you get the full value out of your investment. It might feel like an extra step, but it's the most important one for guaranteeing your new guards perform as expected.

Clean and Inspect Your Gutters

First things first: you need to give your gutters a deep clean. Remove all leaves, twigs, and gunk so you can see exactly what you’re working with. Once they’re sparkling clean, it’s time for a careful inspection. Walk the perimeter of your home and look for any sections that are sagging or holding standing water, as this indicates a problem. Check that all the hangers are securely fastened to the fascia board. You’ll also want to examine the fascia itself for any signs of rot or damage. Finally, look closely for leaking seams, rust spots, or small holes that need to be sealed before you cover them up.

Repair Loose Gutters and Hangers

While inspecting your gutters, you might notice some sections feel a bit wobbly or have pulled away from the house. This is a common issue, especially with older spike-and-ferrule hangers, and it’s a problem you need to fix before adding guards. The extra weight of the guards can put more strain on loose sections. To secure them, you can add new gutter hangers between the existing ones. These modern hangers clip onto the gutter and screw directly into the fascia board, pulling the gutter tight against the house and providing much-needed support. A stable, secure gutter is essential for a successful guard installation.

Pick the Perfect Day for Installation

Your installation day can have a real impact on the final result, so check the forecast before you start. The ideal time to install gutter guards is on a dry, mild day with temperatures somewhere between 40°F and 85°F. This is especially important if your installation requires any sealants or adhesives, as they need the right conditions to cure properly. Try to avoid days with heavy rain, high winds, or freezing temperatures, which can make the work more difficult and even unsafe. Planning your project for a clear day in the late spring or early fall is usually your best bet.

How to Install Gutter Guards: A Step-by-Step Guide

Once your gutters are clean and in good repair, you can move on to the main event: installing the guards. The exact process will vary slightly depending on the type of guard you choose, but the core steps remain the same. It’s a project that requires precision and a steady hand, especially when you’re working on a ladder.

Remember to always read the manufacturer’s instructions that come with your specific product before you begin. This guide will walk you through the general process, giving you a clear picture of what the job involves from start to finish. Taking your time with each step is the key to a secure, long-lasting installation that effectively protects your gutter system. If you feel unsure at any point, don't hesitate to call in a professional. A proper installation is crucial for preventing water damage to your home's foundation, siding, and roof.

Measure and Position the Guards

Before you fasten anything, start by measuring the total length of your gutters to confirm you have enough material. Once you’ve confirmed your supplies, lay a section of the gutter guard into the gutter without screwing it in just yet. The goal here is to see how it fits and make sure it sits correctly. The guard should slope slightly with the roofline to help leaves and debris slide off easily. Position the first piece at one end of the gutter, making any necessary cuts with tin snips for a perfect fit around corners or downspouts.

Secure the Front Edge

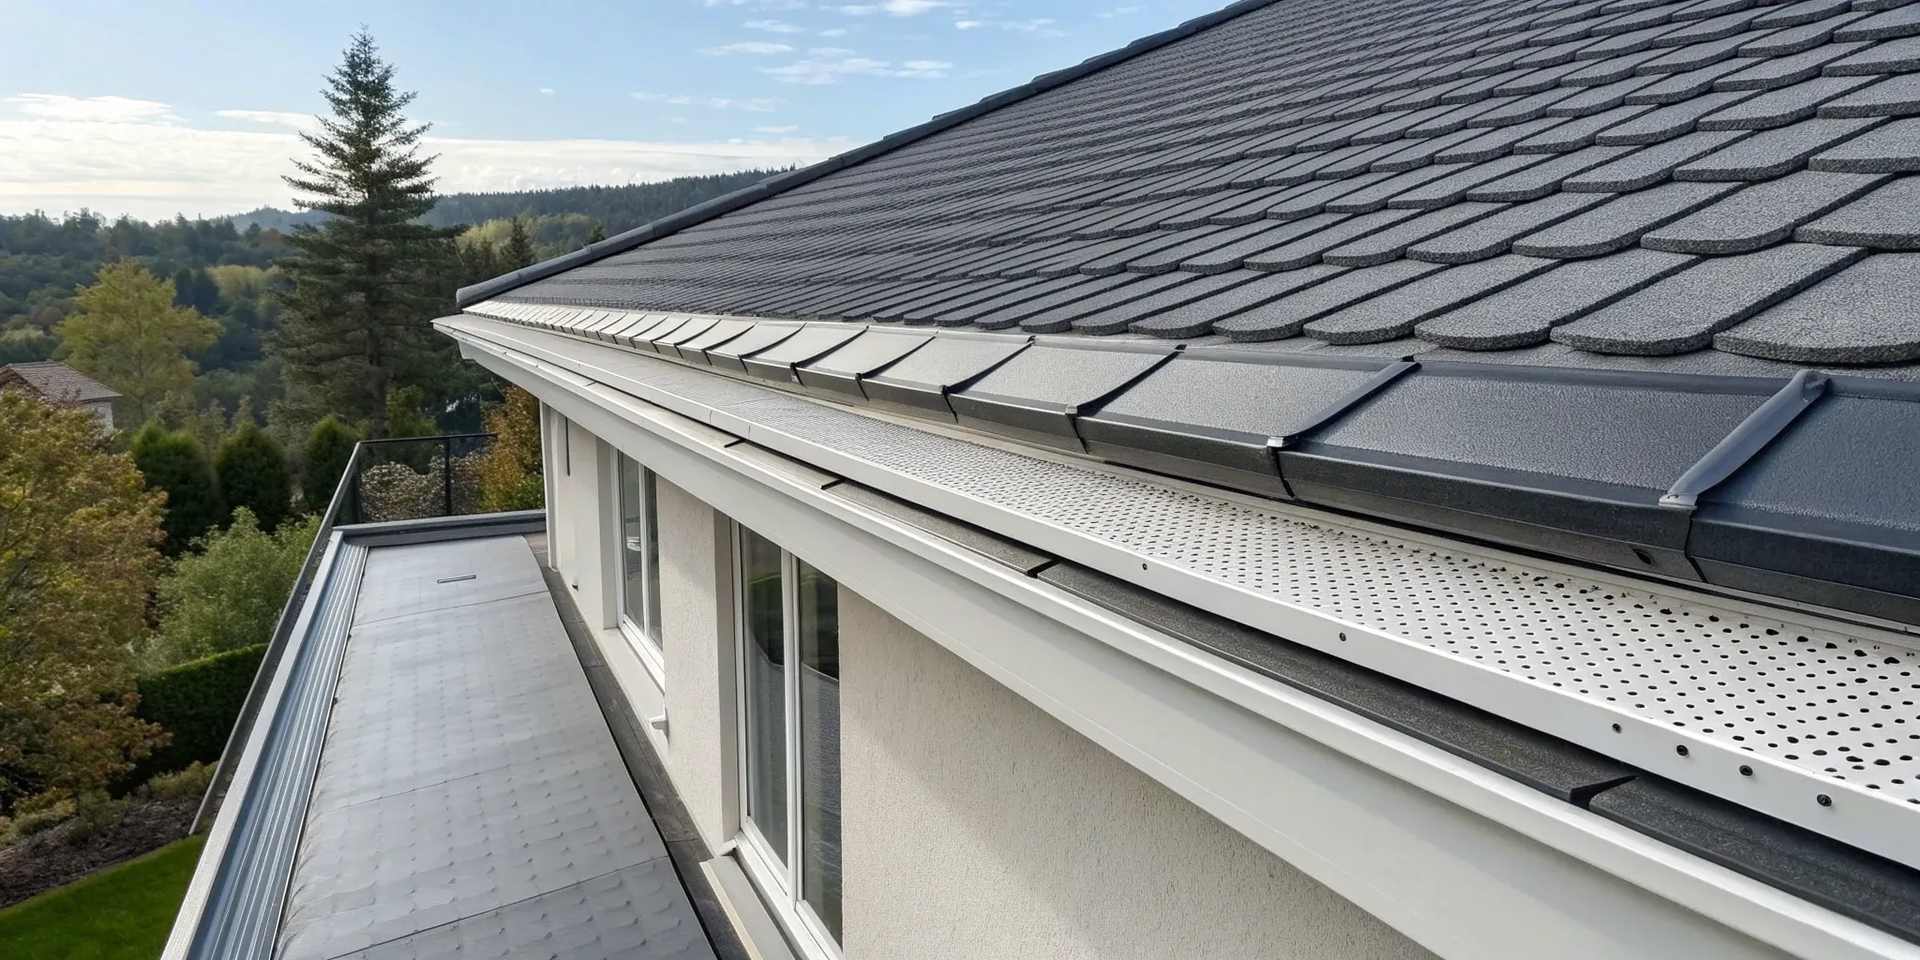
With the first guard section positioned correctly, it’s time to secure it. Start with the front edge, which is the side facing away from your house. Most gutter guard kits come with self-tapping screws for this purpose. Fasten the front lip of the guard to the front edge of the gutter. A good rule of thumb is to place a screw every 18 to 24 inches to ensure it’s held down firmly and won’t lift during heavy rain or wind. Make sure the guard remains snug against the gutter’s edge as you work your way down the line.

Attach the Back Edge

After securing the front, you’ll attach the back edge of the guard. This side typically rests against the fascia board (the board behind the gutter) or tucks under the first row of shingles. Depending on the design, you may need to use longer screws to secure it to the fascia. Be extremely careful not to damage your roof. Puncturing your shingles can create an entry point for water and may even void your roofing warranty. This is one of the most common DIY mistakes and a great reason to consider professional installation to protect your investment.

Seal All Seams and Corners

The final step is to seal any joints to create a seamless barrier against debris. Overlap each new section of gutter guard by about half an inch over the previous one as you work your way down the gutter. Once all the sections are installed, apply a bead of waterproof, outdoor-grade silicone sealant at every seam, corner, and end cap. This prevents small debris and water from sneaking through the gaps, ensuring your entire gutter system is completely protected and functions as a single, effective unit.

Avoid These Common Gutter Guard Installation Mistakes

Installing gutter guards seems like a straightforward weekend project, but a few common missteps can turn your efforts into a costly headache. The goal is to protect your home from water damage, not create new problems. When installed correctly, gutter guards are a fantastic investment that saves you from the risky chore of climbing a ladder to clean out muck. But a poor installation can lead to overflowing gutters, roof leaks, and even damage to your home’s foundation.

Getting it right the first time is crucial. That means understanding the potential pitfalls before you even unbox your new guards. From choosing the wrong product for Georgia’s heavy rains and pine needles to accidentally voiding your roof warranty, the stakes are higher than you might think. We’ll walk you through the most frequent mistakes we see so you can avoid them. A successful installation ensures your gutter system functions perfectly, channeling water away from your home exactly as it should. Taking the time to learn these key points will help protect your home and your investment.

Picking the Wrong Guard for Your Home

Not all gutter guards are created equal, and what works for a home in a dry climate might not stand up to our humid summers and heavy downpours. Choosing the right type of guard is the first and most important step. You need to consider your specific environment. Do you have tall pine trees that drop fine needles, or large oak trees that shed big leaves? The type of debris is a major factor. For fine particles like pine needles and pollen, a micromesh guard is often the best defense. It prevents tiny debris from slipping through and creating sludge in your gutters, ensuring water can flow freely when you need it to.

Using Improper Alignment and Attachment

How you position and secure your gutter guards is just as important as which ones you buy. Proper alignment is key to performance. The front edge of the guard should sit flush with the outer lip of the gutter, while the back edge should slide neatly under your roof’s drip edge. Be careful not to lift the shingles, as this can create a pathway for water to get under your roof. When it comes to attaching the guards, always follow the manufacturer's instructions. Use the provided clips or screws to secure the guards directly to the gutter itself, never to your roof.

Forgetting to Repair Gutters First

Placing brand-new guards on a faulty gutter system is a recipe for failure. Before you begin installation, give your existing gutters a thorough inspection. Look for any signs of trouble, like sagging sections, loose hangers, or leaking seams. Check that the gutters have the correct slope to drain water effectively toward the downspouts. If you spot any rust, holes, or damage to the fascia board behind the gutters, those issues must be addressed first. Installing guards on damaged gutters will only trap debris and worsen the existing problems, so make sure your gutters are in solid shape before you proceed.

Attaching Guards Directly to Your Shingles

This is one of the most critical mistakes to avoid, as it can cause serious and expensive damage. Never attach gutter guards by screwing or nailing them directly into your roof shingles. This practice punctures your roof's primary water-shedding layer, creating an entry point for leaks that can lead to wood rot and interior water damage. Even worse, it can completely void your roof’s warranty, leaving you on the hook for future repairs. Your residential roofing system is designed to work as a whole, and altering it improperly compromises its integrity. Gutter guards should always be attached to the gutters themselves, not the roof.

Installation Tips for Different Gutter Guard Types

Not all gutter guards are created equal, and their installation methods can vary quite a bit. The right technique depends entirely on the type of guard you’ve chosen for your home. Whether you're working with a delicate micromesh screen or a simple foam insert, paying attention to the specific installation details is key to getting a secure fit that effectively protects your gutter system. Getting it right from the start saves you from headaches and potential repairs down the road. Some guards slide right in, while others require screws and careful alignment with your roofline. Understanding these differences before you start will make the entire process smoother and ensure your new guards function correctly from the first rainfall. Below are some specific tips for the most common types of gutter guards to help guide your project.

Installing Micromesh and Screen Guards

When you’re working with micromesh or screen guards, the most important detail is the overlap. Each panel should overlap the next by at least half an inch to create a seamless barrier. This small step is crucial for preventing sneaky debris like pine needles and shingle grit from finding their way into your gutters. Using a high-quality micromesh material also makes a big difference in filtering out smaller particles while letting rainwater flow freely. Following a detailed guide can help you achieve a secure fit and ensure the guards perform as they should for years to come.

Installing Brush Guards

Brush guards are one of the more straightforward types to install. These bristly guards look like giant pipe cleaners and simply slide into place inside your gutters. You can easily cut them to size with wire cutters to fit the exact length of your gutter runs. The main goal here is to ensure they fit snugly from end to end. If the brushes are loose, they can shift around, creating gaps where leaves and twigs can get trapped. Remember that these guards will catch debris in their bristles, so you’ll need to pull them out and clean them periodically to keep them working well.

Installing Foam Inserts

Foam inserts are another user-friendly option that you can typically install without many tools. These triangular foam blocks are designed to fit directly into the gutter channel, blocking debris while allowing water to filter through the porous material. For a successful installation, measure your gutters and cut the foam inserts to the correct length. You want a tight fit with no gaps at the seams or ends, as these openings can invite debris. Like brush guards, foam inserts will need regular maintenance. Plan to remove and rinse them out occasionally to prevent clogs and ensure water can always pass through.

DIY vs. Pro Installation: Which Is Right for You?

Deciding whether to install gutter guards yourself or hire a professional is a big question for many homeowners. On one hand, a DIY project can feel empowering and save you some money upfront. On the other hand, a professional installation ensures the job is done correctly, protecting your home from potential water damage. The right choice really depends on your skill level, the complexity of your roof, and how much time you’re willing to invest. Let’s walk through the key factors to help you decide which path is best for your home.

When to Tackle the Project Yourself

If you’re comfortable with home improvement projects and have a knack for working with your hands, installing gutter guards can be a very manageable DIY task. For a single-story home with a straightforward roofline, the process is often as simple as cleaning the gutters and snapping or sliding the guards into place. The biggest challenge is usually working safely and comfortably on a ladder. If you have the right tools, a free weekend, and aren't afraid of heights, you can definitely tackle this project on your own and feel a great sense of accomplishment.

Signs It's Time to Call a Professional

While DIY is a great option for some, there are clear signs when calling in an expert is the smarter move. If you have a multi-story home, a steep or complex roofline, or your existing gutters are damaged, it’s best to leave it to the pros. Even small installation mistakes, like improper alignment or leaving gaps, can lead to overflowing gutters and expensive water damage down the road. A professional gutter installation guarantees that the job is done safely and correctly, as experts have the right safety gear and experience to handle any challenges your home’s architecture might present.

Weighing the Cost and Time Commitment

Cost is often the main reason homeowners consider a DIY approach. While you can save on labor costs by doing it yourself, it’s important to weigh that against the potential risks. An improper installation can sometimes void your roof or gutter guard warranties, turning a money-saving project into a costly mistake. You also have to consider your time. What might take you an entire weekend, an experienced team can often complete in just a few hours. Hiring a professional is an investment in quality, efficiency, and the peace of mind that comes with knowing your home is properly protected.

How to Test Your Work and Troubleshoot

You’ve installed your new gutter guards, and the finish line is in sight. Before you pack up your tools, it’s crucial to run a few simple tests to make sure everything is working as it should. This final check ensures your hard work pays off by effectively protecting your home from water damage. A few minutes of testing now can save you from discovering a problem during the first heavy downpour. Think of it as quality control for your own project. By checking for proper water flow and making small adjustments, you can confirm your gutter guards are ready to handle whatever the weather throws their way. This process helps you catch common issues like misalignment or small gaps that could compromise the entire system.

Test for Proper Water Flow

The main job of your gutter guards is to let water in while keeping debris out. The best way to test this is to simulate a rainstorm. Grab a garden hose and spray water onto the roof section above your newly installed guards, not directly onto the guards themselves. Watch carefully as the water runs down the roof and over the guards. You want to see it flow smoothly through the mesh or openings and into the gutters below. If you see water sheeting over the edge and spilling onto the ground, something isn’t right. This simple test helps you confirm that your system can handle a steady stream of water without overflowing.

Adjust Misaligned Guards

If water is spilling over the edge of your gutters, the most likely culprit is improper alignment. Your gutter guards need to be positioned correctly to guide water effectively. The front edge of the guard should sit flush with the outer lip of the gutter. The back edge should slide just under your roof’s shingles without lifting them up. This creates a slight downward slope that encourages water to flow into the gutter instead of off the side. If you spot a problem area, carefully unfasten the misaligned section and reposition it until it sits correctly. Proper alignment is key to preventing overflow and ensuring your guards perform their best.

Fix Gaps and Loose Sections

Once you’ve confirmed the alignment is correct, do one last visual inspection along the entire length of your gutters. Look for any small gaps between the guard panels, especially at the corners or where two sections meet. Even small openings can let in debris or cause leaks. Use a quality outdoor-grade sealant to close any gaps you find. You should also double-check that the gutters themselves are securely fastened to your home. A loose gutter can’t properly support a new guard system. Making sure your entire residential roofing and gutter system is secure will ensure your installation lasts for years to come.

Keeping Your Gutter Guards in Top Shape

Gutter guards are a fantastic addition to your home, saving you from the constant chore of scooping out leaves and debris. But to get the most out of them, a little bit of upkeep is key. Think of it as low-maintenance, not no-maintenance. By staying on top of a few simple tasks, you can ensure your gutter guards continue to protect your home from water damage for years to come. This proactive approach keeps your entire roofing system healthy and prevents small issues from turning into costly repairs down the road.

Just like any other part of your home's exterior, your gutter guards are exposed to the elements year-round. They face heavy rain, falling leaves, pollen, and even pests. A regular maintenance routine ensures they can handle whatever nature throws their way without failing. Neglecting them can lead to the very problems you installed them to prevent, like clogged downspouts, water overflowing onto your foundation, and ice dams in the winter. Taking a few minutes each season to inspect and clean your guards is a small investment of time that pays off big in protecting your property. Let's walk through a simple schedule and checklist to keep your guards in peak condition.

Create a Regular Inspection Schedule

The best way to prevent problems is to catch them early. That’s why a regular inspection schedule is so important. Plan to give your gutter guards a quick look at least twice a year, ideally in the late spring and late fall. It’s also a smart idea to check on them after any major weather event, like a heavy thunderstorm or high winds. During your inspection, look for any debris like leaves or twigs sitting on top of the guards. Also, check for any sections that look bent, warped, or have pulled away from the gutter. A quick visual scan from the ground can help you spot potential issues before they cause a backup.

Your Seasonal Maintenance Checklist

Beyond a quick visual check, a little seasonal cleaning will keep your system flowing smoothly. In the spring, after pollen and seeds have fallen, use a garden hose with a spray nozzle to rinse off the guards. This helps clear away fine particles that can clog the mesh. In the fall, once the trees are bare, use a leaf blower or a soft-bristled brush to remove any accumulated leaves from the surface. While you’re up there, take a moment to ensure your gutters are still securely attached and that there are no signs of rust or leaks. This simple routine prevents buildup and keeps water moving freely away from your home.

Knowing When It's Time for a Replacement

Even with great care, gutter guards won't last forever. It's important to recognize the signs that they need to be repaired or replaced. Look for visible damage like cracks, holes, or significant rust. If you notice sections are sagging, warping, or have pulled away from the roofline, they are no longer providing proper protection. Another major red flag is water spilling over the sides of your gutters during a normal rainstorm; this means the guards are clogged or have failed. If you spot any of these issues, it’s time to consider a replacement to protect your residential roofing system. Addressing wear and tear promptly prevents water from damaging your fascia, foundation, and landscaping.

Related Articles

CONTACT US


Frequently Asked Questions

Do gutter guards mean I'll never have to clean my gutters again? While gutter guards drastically reduce how often you need to clean your gutters, they are low-maintenance, not no-maintenance. Over time, fine particles like shingle grit and pollen can accumulate, and some leaves might rest on top of the guards. You'll simply be trading the difficult task of scooping heavy, wet gunk for the much easier job of occasionally brushing or rinsing the surface of the guards to keep them clear.

Will installing gutter guards damage my roof or void my warranty? A proper installation should never damage your roof or affect its warranty. The key is to attach the guards directly to the gutters themselves, not to the shingles. Puncturing your shingles creates a direct path for water to get underneath, which can lead to serious issues and will likely void your warranty. This is one of the most important reasons to follow installation instructions precisely or to hire a professional who knows how to protect your roofing system.

How do gutter guards handle heavy rainstorms? High-quality gutter guards are specifically engineered to manage heavy water flow without overflowing. When installed correctly with a slight downward slope, they channel water directly into the gutter while allowing leaves and debris to wash over the edge. If you live in an area with frequent downpours, choosing a product with a high-flow design, like a quality micromesh, is essential for ensuring your system can keep up.

Can I install guards on my existing gutters, or do I need new ones? You can absolutely install gutter guards on your existing gutters, as long as they are in good shape. Before installation, it's important to make sure your current gutters are not rusted, sagging, or leaking. If they have been properly repaired and secured to your home, they provide a perfect foundation for a new guard system. If your gutters are significantly damaged, however, it is best to replace them first.

Are all gutter guards the same? Not at all. Gutter guards come in many different styles, such as micromesh, screen, brush, and foam, and each is designed to handle different types of debris. The best choice for your home depends on your specific needs, like the types of trees you have on your property. A home surrounded by pine trees, for example, will benefit most from a micromesh guard that can block fine needles, while a home with large oak trees might do well with a different style.


Roofer inspecting damaged shingles to estimate the leaky roof repair cost.
By Stephen Griswell February 18, 2026
Get a clear look at leaky roof repair cost, common causes of leaks, repair options, and tips to help you save money on your next roofing project.
Modern house with a professional exterior painting job, featuring white siding and dark trim.
By Stephen Griswell February 17, 2026
Get expert tips on exterior house painting, from choosing the right paint to avoiding common mistakes, for a finish that lasts and looks beautiful.
A modern home with a completed DIY metal roof installation.
By Stephen Griswell February 16, 2026
Get practical tips for metal roof installation, from choosing materials to safety steps, in this clear, step-by-step guide for homeowners and DIYers.
Professional seamless gutter installation on a modern residential home.
By Stephen Griswell February 12, 2026
Get practical tips on seamless gutter installation, from choosing materials to maintenance, so you can protect your home from leaks and water damage.
metal over shingle roofs
By SEO Analysis January 27, 2026
Can you put a metal roof over shingles? Learn when it’s allowed, pros and cons, code rules, moisture risks, and when a tear-off is the better option.
By SEO Analysis January 12, 2026
Replacing a roof is a major decision for any homeowner. A roof protects the structure, controls moisture, and supports energy efficiency. When problems increase, many homeowners ask one clear question: should I replace my roof now, or should I continue with home roof repairs? This guide provides everything you need to know before proceeding with a roof replacement . The goal is to help you understand residential roof replacement so you can make the right decision for your home, your budget, and your long-term plans. What Roof Replacement Means A roof replacement means removing the existing roofing system and installing a new roof. Contractors remove old shingles, underlayment, and damaged materials. They inspect the roof deck and repair structural issues if needed. They then complete a new roof installation using approved materials. This process is different from repairs. Repairs fix limited damage. Replacement rebuilds the entire roofing system. Signs You May Need to Replace Your Roof Roof Age Roof age is a key factor. Asphalt shingle roofs often last 20 to 25 years. Metal roofs last longer. Tile and slate roofs can last several decades. If your roof is near or past its expected lifespan, replacement is often the right option. Frequent Home Roof Repairs If you schedule repairs every year, costs increase over time. Multiple leaks or repeated shingle damage often signal system failure. At that point, replacement may cost less than ongoing repairs. Widespread Damage Damage across large areas often requires replacement. Common signs include: Missing or cracked shingles across the roof Soft or rotted roof decking Sagging roof lines Water stains in multiple attic areas Localized damage may support repair. Widespread damage usually supports replacement. Storm and Weather Exposure Severe weather shortens roof life. If storms cause repeated damage, a residential roof replacement may provide better long-term protection. Roof Repair vs Roof Replacement Roof Repair Fixes isolated problems Lower upfront cost Shorter project timeline Limited lifespan extension Residential Roof Replacement Rebuilds the entire roofing system Higher upfront cost Longer project timeline Long-term durability and warranty When repairs no longer provide stability, replacement becomes the practical solution. Benefits of Residential Roof Replacement Long-Term Protection A new roof provides complete coverage. New underlayment and flashing reduce leak risk. Updated materials handle weather better. Increased Home Value A roof replacement improves curb appeal. Buyers prefer homes with a recently roof installed. Appraisers also consider roof age and condition. Improved Energy Efficiency Modern roofing materials reflect heat more effectively. Proper ventilation improves airflow and helps reduce energy costs. Warranty Coverage Most residential roofing replacement projects include manufacturer and workmanship warranties. These warranties reduce long-term risk. Types of Roofing Materials Asphalt Shingles Most common residential material Affordable and reliable Available in many colors and styles Architectural Shingles Thicker than standard shingles Longer lifespan Better wind resistance Metal Roofing Long lifespan Energy efficient Higher upfront cost Tile Roofing Durable and heavy Requires strong roof structure Long service life Slate Roofing Premium roofing material Very long lifespan Higher cost and weight Material choice affects cost, durability, and appearance. Understanding the Roof Replacement Process Step 1: Inspection A professional roofer inspects shingles, flashing, decking, and attic ventilation. This step confirms whether replacement is necessary. Step 2: Estimate and Planning You receive a detailed estimate that includes materials, labor, timeline, and disposal. Contractors also explain permits and inspections. Step 3: Material Selection You choose roofing materials, colors, and styles. The contractor confirms compatibility with your home. Step 4: Tear-Off Crews remove the old roof and dispose of debris safely. This exposes the roof deck for inspection. Step 5: Deck Repair If the deck shows damage, crews repair it. A solid deck is required for a proper new roof installation. Step 6: Installation Contractors install underlayment, flashing, and roofing materials. Everything is installed according to code and manufacturer requirements. Step 7: Final Inspection The contractor inspects the completed roof. Local inspectors may also review the work. How Long Roof Replacement Takes Most residential roof replacement projects take one to three days. Larger or more complex roofs may take longer. Weather conditions can also affect timing. Cost Factors to Consider Several factors affect roof replacement cost: Roof size and slope Roofing material type Structural repairs Labor rates Permit and disposal fees Understanding these factors helps you plan your budget. Budgeting for Roof Replacement Plan early when possible. Get multiple estimates. Ask for itemized pricing. Understand payment schedules. Some contractors offer financing options. Common Mistakes to Avoid Waiting too long to replace the roof Choosing price over quality Ignoring ventilation needs Skipping professional inspections Avoiding these mistakes protects your investment. Roof Replacement and Home Insurance Insurance may cover roof replacement after storm damage. Coverage depends on policy terms and roof age. Document damage and contact your provider promptly. Permits and Building Codes Most roof replacements require permits. Licensed contractors handle this process. Permits ensure the roof installed meets safety and code requirements. Preparing Your Home for Roof Replacement Before Installation Clear driveways and walkways Remove wall decorations Protect attic items Notify neighbors During Installation Expect noise and vibration. Crews manage debris and safety areas. After Installation Inspect the yard for nails. Review warranty documents. Schedule follow-up inspections if recommended. How Long a New Roof Lasts Roof lifespan depends on material and installation quality: Asphalt shingles: 20–25 years Architectural shingles: 25–30 years Metal roofing: 40–70 years Tile or slate roofing: 50+ years Proper maintenance extends roof life. Maintaining Your New Roof Schedule annual inspections Clean gutters regularly Trim overhanging branches Address small issues early Maintenance helps reduce future repair costs. When to Replace My Roof Instead of Repairing You should replace my roof when: Repairs occur frequently Damage affects large areas Roof age exceeds lifespan Structural problems exist Replacement offers stability and long-term savings. Residential Roofing Replacement and Resale Buyers value a new roof. Homes with recent residential roofing replacement often sell faster and face fewer inspection issues. Choosing the Right Roofing Contractor Look for: Proper licensing and insurance Clear written estimates Warranty coverage Local experience Strong customer reviews The right contractor ensures quality results. FAQ How do I know when to replace my roof? Check roof age, damage extent, and repair history. Widespread or frequent issues usually indicate replacement. Can I live in my home during roof replacement? Yes. Most homeowners stay in the home, though noise is expected during work hours. How much does residential roof replacement cost? Costs vary by roof size, material, and repairs needed. A professional inspection provides accurate pricing. Does a new roof increase home value? Yes. A new roof installation improves curb appeal and buyer confidence. Get a Free Roof Replacement Estimate with Total Roof Solutions Roof replacement is a major project, but it delivers long-term protection and value. When repairs no longer solve the problem, replacing the roof is the smart choice. If you are considering a roof replacement, Total Roof Solutions is ready to help. Our team provides professional inspections, clear estimates, and expert residential roof replacement services. Contact Total Roof Solutions today to schedule your roof evaluation and move forward with confidence.
By SEO Analysis January 5, 2026
Roof inspections are the basis for every roofing repair or replacement estimate. Skilled, experienced contractors go over every inch of your home's roof, looking for storm damage, minor issues, and things that may cause problems in the future. They discuss your roof's condition with you and recommend remedies to bring it up to speed. Depending on their advice, you could be looking at a quick repair job or a full roof replacement, which dictates the overall price. There’s no single price tag for roof repairs. Costs come from materials, labor, permits, site conditions, and local market forces. Knowing those drivers helps homeowners set realistic budgets and avoid surprises. This guide walks through the main cost factors for residential roof repair in 2026: material choice, damage type, roof size and pitch, accessibility, labor and permit fees, and local location effects. You’ll get simple rules of thumb for repair vs. replace, how permits and labor affect costs in the Atlanta/McDonough area, and practical financing or insurance options to lower out-of-pocket expenses. We use clear examples, compact tables that link factors to typical impacts, and actionable checklists so you can compare options and request an accurate local estimate. Relevant local terms like roof repair costs in Atlanta , asphalt shingle repair cost, roof pitch and repair pricing, and roof repair permits in Georgia appear where they help homeowners find local, helpful information. What Are the Main Factors Affecting Residential Roof Repair Costs? The biggest cost drivers change how much material, crew time, and admin work a job needs. They decide whether a visit is a quick patch or a multi-day project. Key factors include materials (shingles, flashing, underlayment), damage type and severity (minor leak versus structural rot), roof size and pitch, access, labor rates, permits, and local market conditions. Fixing minor problems early usually keeps costs down because it prevents interior damage and mold that can multiply the bill. The most reliable next step is a professional inspection that identifies the exact scope. Many local, licensed contractors in McDonough provide inspections and free estimates that translate these factors into a written cost breakdown. How Do Roofing Materials Influence Repair Prices? The roofing material sets both the cost of the parts and the skill required for the work, so material choice directly affects price and long‑term performance. Asphalt shingle repairs are usually the most affordable because materials are common and crews can work quickly; patching and replacing a few shingles is routine. Metal, tile, and slate call for specialty tools and tradespeople, which can raise costs and sometimes require extra time to match materials. Consider lifespan, too: cheaper materials may require more frequent repairs, while higher-cost options often reduce maintenance costs over time and shift the repair-vs-replace calculation. Common material differences: Asphalt shingles: lower material cost, faster repairs. Metal: higher parts cost and specialized fastening/detail work. Tile/slate: highest labor skill and matching/replacement costs. Specialty materials also increase the risk of hidden costs, as matching pieces and careful removal often require experienced crews. What Types of Roof Damage Affect Repair Expenses? Damage type tells you whether a fix is cosmetic, functional, or structural. Those tiers span very different price ranges and future risks. Minor problems like a few missing shingles or a leaking pipe boot usually need local repairs and limited labor. By contrast, flashing failures, extensive water intrusion, rot, or storm damage can require tear‑off, decking replacement, or interior maintenance. Hidden issues such as wet insulation, mold, or compromised decking can quickly expand the scope and bring in other trades, raising the combined cost. Finding severity early reduces the risk that a small repair will turn into a costly replacement and interior remediation. Typical repair categories: Minor leak patches and shingle replacement. Flashing or pipe boot repairs and replacements. Decking or underlayment replacement because of rot. These categories help homeowners set expectations and estimate likely price brackets before contractor bids arrive. How Do Roof Size, Pitch, and Accessibility Affect Repair Costs? Roof shape and site conditions translate directly into labor hours, equipment needs, and safety measures, the largest drivers of labor-based pricing. Roof area (measured in squares or square feet) scales materials and crew time, so larger roofs cost more. Pitch increases fall‑protection needs and slows crews; steep roofs often require harnesses, roof jacks, scaffolding, or staging that add rental fees and extra hours. Tight yards, trees, or limited parking require more manual carrying and landscaping protection, which increases labor and handling fees. Why Does Roof Pitch Increase Labor and Equipment Costs? Steeper roofs make the work harder and the safety requirements stricter, which lengthen jobs and increase gear requirements. Slopes slow crew speed and usually require harnesses, roof jacks, or scaffolding; those controls take extra setup time and sometimes rental fees. The slower pace and added protections expand labor hours. They may require a larger crew for safe material handling, so identical material repairs on different pitches can have notably different labor costs. Treat pitch as a predictable multiplier when comparing bids. Always compare quotes that break out fall protection, staging, and crew size, rather than relying on a flat per-square price with no detail. How Does Roof Accessibility Impact Labor Rates and Project Time? Accessibility determines how fast crews can set up and move materials, which changes hourly totals and potential add‑on fees. Tight yards, gates, or valuable landscaping require extra protection and more manual carry, which increases labor hours and slows progress. Limited parking or driveway access can force longer handling routes or off‑site staging, adding logistics time that contractors often include in estimates. These access issues can also extend timelines and affect seasonal pricing. When you request bids, note access constraints and ask contractors to list handling and protection charges so line items are transparent and comparable. What Role Do Labor Costs, Permits, and Location Play in Roof Repair Pricing? Labor, permits, and local market conditions are external variables that shift final pricing by region and season. Labor is a large portion of most repair estimates because it covers skilled crews, licensing, insurance, and warranties. Permits and inspections add fixed administrative fees and can create scheduling delays for permitted work; disposal costs for tear‑offs and waste hauling are another practical expense. Peak demand, after storms for example, pushes up labor rates and extends lead times, while slower seasons can produce more competitive pricing. Homeowners in McDonough and the greater Atlanta region should expect permit and disposal fees to appear as separate items on estimates. Local, licensed providers like Total Roof Solutions know the McDonough permit rules and typical labor rates, which help produce accurate, region‑aware bids. How Do Local Labor Rates and Contractor Expertise Affect Total Costs? Local labor rates reflect wages, demand, and crew experience; experienced contractors can charge more up front but often reduce rework and warranty claims. Labor usually accounts for a large share of the invoice, and the mix of hourly crews and fixed bids affects risk allocation. A seasoned team lowers hidden costs by spotting secondary damage early, using proven installation practices, and offering material and workmanship warranties that protect homeowners. Always verify licensing, insurance, and warranty terms so you can weigh higher upfront labor costs against long‑term value and fewer callbacks. When Are Permits and Inspections Required, and What Are Their Fees? Permits are generally required for full replacements, structural decking repairs, and some substantial reroofing projects; small, isolated repairs often don’t need one. Fee schedules and inspection timelines vary by municipality and scope. In McDonough and the surrounding Atlanta area, check local building department rules or hire a licensed contractor who handles permit management. Skipping required permits can lead to fines or problems at sale, so following the code protects your investment. When you get estimates, ask if the contractor will secure permits and handle inspections as part of the quoted price to avoid surprise administrative costs. When Should You Repair or Replace Your Roof to Manage Costs Effectively? The repair vs. replace decision depends on roof age, extent and frequency of problems, and the relative cost of repeated fixes versus a new roof. Repair is often appropriate for localized roof issues with useful life remaining. Replacement makes sense for repeated leaks, large areas of missing shingles, extensive rot, or a roof near the end of its expected life. A practical rule: if a single repair approaches a significant portion of a replacement estimate or problems return quickly, replacement is usually the smarter financial choice. Factor in long‑term value, energy savings, and resale impact when deciding. Repair : Localized damage, newer roof, minor leaks. Replace : Widespread damage, structural rot, and a roof near the end of its life. Rule of thumb : If a repair is about 30–50% of replacement cost, consider replacement. Homeowners often use financing to manage large projects; licensed contractors can assist with insurance claims and offer financing plans to spread payments. Those options can lower the upfront burden and make timely repairs or replacements possible, which often saves money compared to overreacting to emergency failures. What Signs Indicate That Roof Replacement Is More Cost-Effective Than Repair? Signs that replacement is likely the better option include repeated leaks, big patches of missing shingles, visible decking rot, sagging, or a roof near the end of its expected lifespan. Ongoing callbacks after repairs or numerous roof penetrations are also red flags that problems are systemic rather than isolated. If an inspection shows recurring or widespread issues, consolidating into a single replacement often saves money and hassle over the long term. Replacing at the right time also improves energy efficiency and curb appeal, making it a real homeowner benefit. Plan replacement when it stops being a temporary fix and becomes the long‑term, cost‑effective solution. How Can Financing Options Help Homeowners Afford Roof Repairs? Financing spreads the cost of extensive repairs or replacements and makes timely decisions more manageable, reducing the risk of interior damage and emergency expenses. Options include home‑improvement loans, home‑equity lines, contractor financing, and insurance payouts for storm damage. Each choice involves trade-offs in interest, terms, and approval speed, so compare total interest and fees with the cost of delayed repairs. Talk about payment options early with contractors. Many local providers can help with insurance documentation and connect you with financing options that fit your budget and timeline. Weigh total borrowing costs against the potential for higher repair bills or interior damage if work is postponed. For licensed, insured, and bonded residential roof and gutter services in McDonough and the greater Atlanta area, request a free inspection and estimate from Total Roof Solutions. We’ll provide a clear, written cost breakdown that reflects your material choices, permit needs, and available financing or insurance assistance. Frequently Asked Questions What are the common signs that indicate a roof needs repair? Look for missing or damaged shingles, water stains on ceilings or walls, visible sagging, and active leaks during rain. Finding shingle granules in gutters, mold growth, higher energy bills, or attic drafts are also warning signs. Regular inspections catch issues early and prevent minor problems from becoming costly repairs. How can I find a reliable roofing contractor? Start with recommendations from friends, family, or neighbors, and check online reviews. Confirm the contractor is licensed, insured, and has good references. Get multiple written estimates, compare scope and warranties, and ask to see past work. A reputable contractor will explain the process clearly and provide a detailed, written quote. What financing options are available for roof repairs? Financing choices include home‑improvement loans, personal loans, home‑equity lines of credit, and contractor financing plans. Insurance payouts may cover storm damage. Compare interest rates, terms, and fees to pick the option that fits your budget and urgency. Many contractors can help with financing applications and insurance paperwork. How often should I have my roof inspected? Have your roof inspected at least once a year, ideally in spring or fall, and after significant storms. Regular checks help catch minor issues before they grow and extend roof life. Homeowners should also conduct periodic visual checks for apparent damage. What should I expect during a roof inspection? A qualified inspector will evaluate shingles, flashing, gutters, and overall roof condition and may check the attic for moisture or insulation problems. After the inspection, you should receive a report with findings, recommended repairs, and an estimate. Use that report to compare contractor bids and plan next steps. Are there any warranties available for roof repairs? Yes. Many contractors offer workmanship warranties alongside manufacturer material warranties. Coverage and length vary, so ask what’s included and any conditions. Clear warranty terms give you protection and peace of mind after the job is finished. What are the environmental considerations for roofing materials? Consider durability, energy efficiency, and recyclability when choosing materials. Metal and some high‑quality shingles last longer and can be more energy‑efficient. Some manufacturers offer recycled or sustainably produced options. Choosing an energy‑efficient roof can lower heating and cooling costs and reduce your home’s environmental footprint. Get Solid Roof Assessments and Quotes from Total Roof To get a free estimate from a contractor who knows McDonough permitting and storm‑claim processes, contact Total Roof Solutions. We offer inspections, warranties on materials and workmanship, and financing options to help you move forward with confidence. Contact Total Roof today!
By SEO Analysis December 23, 2025
Torch down roofing is a proven solution for flat and low-slope roofs. Many property owners hear the term but do not fully understand how it works or when it makes sense. Others want to know if torch down roofing is better than other flat roof systems. This guide explains everything you need to know before choosing this roofing option. We will cover what torch down roofing is, how it works, the materials involved, installation details, repair options, and when roof replacement is the better choice. The goal is clarity. By the end of this article, you will understand if torch down roofing fits your property. What Is Torch Down Roofing Torch down roofing is a modified bitumen roofing system. It uses rolls of asphalt-based material that installers heat with an open flame. The heat melts the underside of the material, allowing it to bond directly to the roof surface. This system is most common on flat roofs or low-slope roofs. It is used on residential buildings, commercial properties, and multi-family structures. When people ask what is torch down roofing, the simplest answer is this: it is a heat-applied roofing system designed to create a sealed, waterproof surface. How Torch Down Roofing Works Torch down roofing installs in layers. Each layer serves a purpose. First, the installer prepares the roof deck. The surface must be clean, dry, and smooth. Next, a base sheet may be installed. This layer adds stability and protection. Then the installer applies the torch down roofing material. A propane torch heats the roll as it unrolls across the roof. The heat melts the asphalt backing. The material bonds to the surface as it cools. This process creates a strong seal. It reduces seams. It prevents water intrusion. Torch Down Roofing Material Explained Torch down roofing material consists of modified bitumen. Bitumen is asphalt. Manufacturers modify it with polymers to improve flexibility and durability. Common material components include: Asphalt compound Reinforcing fabric (polyester or fiberglass) Granulated top surface or smooth surface The top layer often includes mineral granules. These granules protect against UV damage and weather exposure. Torch down roofing material resists cracking. It handles temperature changes well. It performs reliably in harsh conditions. Torch Down Roll Roofing Torch down roll roofing comes in large rolls. Installers apply each roll in sections. They overlap seams to ensure full coverage. Each roll bonds to the roof using heat. This method reduces the need for fasteners. Fewer fasteners mean fewer penetration points. Torch down roll roofing works well on roofs with minimal slope. Water flows across the sealed surface without pooling in seams. Types of Torch Down Roofing Systems There are two main system types. Two-Layer Torch Down System This system includes: Base sheet Cap sheet The base sheet adds strength. The cap sheet provides weather protection. This system offers better durability and longer lifespan. Three-Layer Torch Down System This system includes: Base sheet Interply sheet Cap sheet The added layer increases thickness and strength. This option suits roofs with higher exposure or heavier use. Torch Down Roofing Details Torch down roofing details matter. Poor detailing leads to leaks. Professional installation is critical. Important detail areas include: Seams and overlaps Roof edges Flashing around vents and drains Wall transitions Parapet walls Installers must apply even heat. They must avoid overheating. Proper technique ensures strong adhesion without damaging the material. Benefits of Torch Down Roofing Strong Waterproofing Torch down roofing creates a continuous seal. Heat bonding reduces seam failure. This system handles standing water better than many alternatives. Durability The material resists tearing and cracking. It handles foot traffic better than single-ply systems. Cost Control Torch down roofing often costs less than premium flat roof systems. It balances performance and affordability. Proven Performance This system has decades of use. Contractors understand its behavior and maintenance needs. Limitations of Torch Down Roofing Fire Risk During Installation Open flames create risk. Only trained professionals should install this system. Not Ideal for All Roofs Torch down roofing works best on flat or low-slope roofs. Steep roofs require different systems. Skilled Labor Required Improper installation causes failure. Experience matters with this roofing type. Torch Down Roofing vs Other Flat Roofing Systems Torch Down Roofing vs TPO Torch down roofing offers thicker material. TPO offers lighter weight and reflective surfaces. Torch down handles foot traffic better. Torch Down Roofing vs EPDM EPDM uses rubber sheets and adhesives. Torch down uses heat bonding. Torch down offers better puncture resistance. Torch Down Roofing vs Built-Up Roofing Built-up roofing uses multiple asphalt layers. Torch down installs faster and uses fewer materials. When Torch Down Roofing Makes Sense Torch down roofing works best when: The roof has low slope or is flat The property needs strong waterproofing Budget matters The roof sees moderate foot traffic It suits residential flat roofs, garages, commercial buildings, and apartment complexes. Torch Down Roofing and Roof Repair Torch down roofing supports effective roof repair. Contractors can patch damaged areas without replacing the full roof. Common repair situations include: Small punctures Seam separation Flashing failure Surface wear Timely roof repair extends system life. Ignoring damage leads to moisture intrusion. When Roof Replacement Is Better Roof replacement becomes necessary when: Damage is widespread The roof deck shows rot The system reaches end of lifespan Repairs repeat frequently Torch down roofing typically lasts 15 to 20 years. Age, exposure, and maintenance affect lifespan. Signs Torch Down Roofing Needs Attention Watch for these warning signs: Blistering or bubbling Cracks in surface Loose seams Ponding water Interior leaks Early inspection prevents major failure. Torch Down Roofing Installation Process Step 1: Roof Inspection Contractors inspect the deck, drainage, and structure. They confirm suitability for torch down roofing. Step 2: Surface Preparation Crews clean the surface. They repair damaged decking. A smooth base is required. Step 3: Base Sheet Installation The base layer installs using adhesive or mechanical fasteners. Step 4: Torch Application Installers heat the torch down roll roofing as they apply it. They control flame and pressure. Step 5: Detail Work Crews seal seams, edges, and penetrations. Flashing receives extra attention. Step 6: Final Inspection The contractor checks adhesion and drainage. They confirm system integrity. Safety Considerations Torch down roofing requires strict safety protocols: Fire extinguishers on site Trained installers only Controlled flame use Protective equipment Safety planning protects property and workers. Maintenance for Torch Down Roofing Maintenance extends lifespan. Recommended practices: Annual inspections Clear debris and drains Repair small issues early Monitor seams and flashing Routine care reduces roof replacement risk. Torch Down Roofing Lifespan Most torch down systems last 15 to 20 years. Proper installation and maintenance can extend service life. Environmental exposure affects durability. High heat, standing water, and heavy use shorten lifespan. Cost Factors for Torch Down Roofing Pricing depends on: Roof size System type Number of layers Deck condition Labor access Torch down roofing often costs less than premium flat roof systems but more than basic repairs. Torch Down Roofing for Residential Properties Torch down roofing works well for: Flat residential roofs Attached garages Additions Multi-unit housing Homeowners choose this system for durability and cost control. Common Mistakes to Avoid Avoid these issues: Hiring untrained installers Ignoring drainage design Skipping inspections Delaying roof repair Mistakes shorten roof life and increase costs. FAQs What is torch down roofing best used for? Torch down roofing works best on flat or low-slope roofs where waterproofing matters most. Is torch down roofing safe? Yes, when installed by trained professionals using proper safety procedures. Can torch down roofing be repaired? Yes. Contractors can perform roof repair on damaged sections without full replacement. How long does torch down roofing last? Most systems last 15 to 20 years with proper maintenance. Get a Free Roof Estimate Today Torch down roofing remains a reliable solution for flat and low-slope roofs. It offers strong waterproofing, durability, and cost efficiency. Understanding torch down roofing details helps property owners make informed decisions. When installed correctly, this system delivers consistent performance. When damage grows or age increases, roof replacement becomes the right move. If you are considering torch down roofing, Total Roof Solutions can help. Our team provides expert inspections, professional installation, and reliable roof repair and roof replacement services. Contact Total Roof Solutions today to schedule an evaluation and get clear answers for your roofing needs.
By SEO Analysis December 16, 2025
When your home roof starts showing signs of wear, you ask yourself: should I arrange a roof repair or go for a full roof replacement? At Total Roof Solutions we deal with this question often. Let’s talk like two neighbors having coffee: your roof has issues, you want solutions. You want facts. You want direct answers. You don’t want jargon. In this article we will cover both sides— roof repair and replacement roof —so you can decide with confidence. We will use clear language. We will define terms. We will show when home roof repairs make sense, and when roof replacements are the smarter move. We also include a detailed FAQ at the end and a strong call to action. Let’s dive in. What is a Roof Repair? A roof repair refers to fixing specific, isolated issues on your roof. Rather than replacing the entire surface, the work addresses trouble spots. Examples: Replacing a few missing shingles. Repairing flashing around a chimney or vent. Fixing a small leak in the roof deck. Repair is generally less expensive up front. It usually takes less time. It serves to extend the life of the roof without replacing the full system. Many times home roof repairs make sense when the damage is limited. What is a Roof Replacement? A replacement roof means removing the existing roofing materials (shingles, underlayment, sometimes decking) and installing a new roofing system. This is more than a patch. It gives a clean slate. Key features often include: New underlayment, new shingles or other materials. Possibly updated flashing and ventilation. A warranty on the full roof system. A full roof replacement costs more initially but can save money in the long run if your current roof is old or heavily damaged. When Roof Repair Makes Sense You should lean toward home roof repairs when: The damage is isolated (for example: a few missing shingles, a minor leak). The roof is relatively new (e.g., less than 10-15 years old for asphalt shingle). You plan to sell soon and want to control cost rather than invest heavily. You have the budget flexibility to monitor and maintain the roof rather than invest now in a full replacement. Here are clear signs repair is appropriate: Visual cues show missing or damaged shingles in one area only. There is no sagging or widespread structural damage. The rest of the roof shows good condition: minimal wear, no repeated leaks. You expect to stay in the home for only a short time, so maximizing near-term value is key. Repair approach gives you a quicker, lower-cost path to keep your home protected while you plan for long-term decision. When Roof Replacement Is the Better Choice You should consider a full roof replacement when: The roof is old, nearing or past its expected lifespan. For example, asphalt shingle roofs often last between 20-25 years. There is widespread damage: many missing shingles, multiple leaks, visible rot, or structural concerns. You have had many home roof repairs in recent years and the costs add up. You want to increase your home’s resale value, improve energy efficiency, or minimize future roof service calls. The underlying decking or structure is compromised, which means patching won’t solve the root problem. Replacement gives you peace of mind. It means fewer surprises. You reduce long-term risk. How to Evaluate Your Roof: Step-by-Step Here is a clear process you can follow: Check the roof age Ask when the current roof was installed. If it’s over 15-20 years old (for asphalt shingles) replacement likely makes sense. Inspect for damage Look for missing or curled shingles, dark streaks, moss growth, sagging roof deck, visible leaks in the attic. Assess the extent Is the damage localized (one area) or spread across the roof? Localized damage tends toward repair. Widespread calls for replacement. Check past repair history Have you needed multiple repairs recently? If yes, replacement likely is smarter. Consider long-term plans How long do you plan to stay in the home? If you plan long-term, replacement becomes more cost-effective. Review available budget Weigh immediate cost (repair vs replacement) and long-term value. Use multiple quotes. Consult a professional roofing contractor A qualified roofer can inspect hidden issues like underlayment damage, decking rot, ventilation problems, and provide a realistic estimate. Cost Considerations: Repair vs Replacement Let’s look at typical cost profiles (these vary by region, material, size). Roof repair: Costs vary widely, from a few hundred dollars to several thousand depending on issue. Roof replacement: Higher cost upfront but fewer ongoing costs. For example, some data suggest full replacement may cost multiple thousands of dollars. Here are factors that affect cost: Roof size and pitch (steep roofs cost more). Roofing material selected (asphalt shingles cost less than metal, tile, or slate). Accessibility and structural work needed (decking, underlayment, flashing). Labor rates in your region. Disposal of old roof materials (for replacement). Additional services: ventilation upgrade, insulation, gutter replacement. Benefits and Drawbacks of Each Option Roof Repair Benefits: Lower initial cost. Quicker to complete. Less disruption to home life. Drawbacks: May only delay the inevitable if the roof is near the end of its life. Patches may not match the rest of the roof, impacting aesthetics. Hidden damage may remain and cause future leaks or failures. Roof Replacement Benefits: Grants a full, fresh roof system with warranty. Less chance of repeated repair calls. Potential for improved energy efficiency and higher home value. Drawbacks: Higher upfront cost. More disruption (noise, cleanup, longer timeframe). If done prematurely when the existing roof still had life, might feel like unnecessary expense. Common Myths and Mistakes Myth: “A small leak always means full replacement.” Not true. If damage is limited and the roof is relatively young, repair may suffice. Myth: “Replacement always improves value more than any repair.” Not always; the value gain depends on the home market, roof material, and condition. Mistake: Ignoring minor issues. Small issues left unchecked can mushroom into big problems. Mistake: Choosing repair simply because it costs less now without reviewing long-term implications. How Total Roof Solutions Can Help You We perform comprehensive roof inspections to assess damage, age, and overall condition. We provide clear quotes for both roof repair and replacement options. We work with high-quality materials and certified installers to ensure your home receives lasting protection. We offer guidance tailored to your home’s needs, budget, and your plans for the future. FAQ Section 1. How do I know if my roof needs repair or replacement? Check the roof’s age, inspect for damage (missing shingles, leaks, sagging), review how many repairs you’ve had. If damage is broad or the roof is old, replacement likely is better. 2. Can I repair part of the roof instead of replacing the whole thing? Yes. If the damage is isolated to a section, you can opt for spot repair or partial replacement. But matching the new portion to the old can be tricky. 3. Will repairing the roof save money compared to replacing it? Often yes in the short term. But if you need frequent residential roof repairs , the cumulative cost may exceed that of one replacement. 4. What if I plan to sell my home soon—should I replace the roof or just repair it? If you plan to sell very soon (within 1-2 years) and your roof is still in decent condition, a repair may suffice. If the roof is old or shows major issues, replacement may yield better buyer appeal. 5. Does roof replacement improve energy efficiency? Yes. Newer roofing materials, improved underlayment, better ventilation and insulation can reduce heat gain/loss. Many roof-service providers note that replacement boosts efficiency. Ready for a Free Roof Estimate? Choosing between roof repair vs roof replacement is a major decision. You need clear facts, tailored options, and no surprises. At Total Roof Solutions we help you weigh your current condition, long-term plans, and budget. If you’re ready to explore your options—whether you aim for a targeted roof repair or are considering a full replacement roof— contact us today for a free inspection and quote . Protect your home now and make the choice that serves you best in the long run.
By SEO Analysis December 2, 2025
When homeowners begin to notice wear and tear on their roof, storm damage, or leaks, they cringe. Paying for roof repairs can be a hard blow to any household budget. Additionally, finding a reputable local company in Atlanta that delivers high-quality work can be challenging. The solution is finding a highly-rated team with a solid reputation that gives honest quotes, so homeowners know how to budget and avoid unnecessary add-ons. Feeling unsure about the cost of residential roof repairs can lead to unexpected expenses or put off necessary maintenance. This guide provides clear cost ranges, explains the key factors that influence pricing, outlines financing strategies, and shows you how to get accurate estimates. You’ll learn about average repair expenses, the elements that affect pricing, from the materials you choose to how severe the damage is, detailed breakdowns for leaks, shingles, metal, and flat roofs, plus tips on handling insurance claims and deciding whether to repair or replace your roof. Along the way, discover why Total Roof’s certified crews in Atlanta deliver top-notch workmanship at straightforward prices. What's the Average Price Tag for Residential Roof Repair? The average cost to repair a residential roof typically falls between $400 and $1,650, depending on the type of damage, the roofing material, and labor rates. Residential roof repair is designed to fix issues like leaks, missing shingles, and storm damage with minimal disruption, restoring your roof’s structural integrity. For many homeowners, understanding these benchmarks helps prevent overpaying and makes budgeting much easier. Getting familiar with common repair services helps establish baseline expenses before diving into specific price variations. What Are the Typical Price Ranges for Common Roof Repairs? Common residential roof repairs include fixing leaks, replacing shingles, repairing flashing, and restoring storm damage. Leak repair services generally cost between $150 and $600, depending on the severity of the leak. Replacing damaged shingles typically ranges from $400 to $1,200. Flashing repair costs usually range from $300 to $800, while storm damage repairs can cost between $800 and $1,650. These price brackets align with national averages and reflect local conditions in Atlanta. Understanding these price ranges helps you prepare your budget before requesting estimates. How Do Roof Repair Costs Differ by Location, Especially in Atlanta? Roof repair costs can vary significantly from one region to another due to differences in labor rates, the availability of materials, and local weather patterns. In Atlanta, average labor rates are $45–$75 per hour, and the frequent occurrence of storms tends to increase repair costs. Areas along the coast or in northern states might see higher rates for repairs needed due to snow loads, while rural areas often benefit from lower overhead costs. These geographic variations can shift the price of a $750 shingle repair by more than 15%. Being aware of local cost drivers helps you create a realistic budget and choose the right contractor. What Are National vs. Local Cost Comparisons for Roof Repairs? Across the nation, homeowners typically spend between $370 and $1,649 on roof repairs, with a median cost of $999. Here in Atlanta, repair prices tend to be 5–10% higher than the national median, primarily due to the region's higher frequency of storms and labor costs. In contrast, some markets in the Midwest report repair costs up to 20% lower than the national average. Comparing these figures helps you determine whether a local quote aligns with broader industry benchmarks. Analyzing both national and local data prepares you to evaluate quotes with a solid understanding of the market. What Factors Influence Residential Roof Repair Prices? The price of residential roof repair is shaped by several interconnected factors that determine the overall expense. These include the extent of the damage, the type of material used, the size and complexity of the roof, labor rates, accessibility, and how urgently the repair is needed. A thorough understanding of each element will help you project costs more accurately and avoid unexpected expenses. Exploring these factors in detail reveals how each aspect contributes to the final repair estimate. How Does the Extent and Type of Roof Damage Affect the Cost? The scope of the damage directly impacts the repair cost by determining the materials required, the labor time needed, and the safety measures necessary. A minor leak under a single shingle might take 1–2 hours and require minimal parts, whereas widespread storm damage across multiple roof sections could take days and necessitate advanced repair techniques. Minor punctures typically cost between $150–$400, while large membrane tears can exceed $1,200. The severity of the damage thus influences both material costs and the time the crew needs to be on-site. How Do Roofing Materials Impact Repair Pricing? Different roofing materials require unique repair methods and parts, leading to varied pricing. Repairing asphalt shingles is generally the most affordable option, while metal roofing repairs involve specialized tools and sealants. Flat roof membranes (like EPDM or TPO) require specific adhesive applications and seam welding, which increases labor costs. The choice of material can change a basic repair from $375 to over $1,000. Choosing durable materials not only affects immediate repair costs but also contributes to long-term savings on maintenance. How Do Roof Size, Pitch, and Complexity Affect Labor Costs? Larger roofs mean more square footage to cover, which increases the amount of material needed and the labor hours required. Steeper roof pitches necessitate additional safety equipment and specialized harnesses, potentially increasing labor rates by 10–20%. Complicated roof designs with multiple valleys and dormers require precise cutting and fitting, which can extend project duration by up to 30%. A larger and more unique roof typically results in higher labor costs and overall repair expenses. What Role Do Labor Rates and Geographic Location Play? Labor rates are influenced by local wage standards, insurance costs, and contractor overhead. In urban areas like Atlanta, rates typically range from $45–$75 per hour, while in rural communities, they might be closer to $30–$50. During peak seasons, high demand can push labor rates up by 15% due to scheduling constraints. Regional economic conditions directly impact the wage component of repair pricing. Understanding these labor variations helps you benchmark quotes and negotiate fair hourly rates. How Do Accessibility and Urgency Affect Repair Costs? Roofs that are difficult to access, such as those with steep angles or limited ground clearance, may require specialized equipment, including scaffolding or boom lifts, which can add $200–$800 to the total cost. Emergency repairs scheduled outside of normal business hours often come with premium fees, potentially up to 25% higher than standard rates. Responding urgently to active leaks frequently involves expedited crew deployment, increasing labor and logistics charges. Factors like accessibility and timing can quickly escalate repair pricing when extra resources are needed. What Does It Cost to Repair Specific Residential Roof Issues? Repair costs vary depending on the specific issue, reflecting the materials required, the complexity of the labor involved, and the level of expertise needed. From simple leak patches to extensive storm damage restoration, each problem comes with its own price profile. This section breaks down common scenarios so you can match your roof’s needs with realistic cost estimates. What Is the Cost to Fix a Roof Leak? Fixing a roof leak typically costs between $150 and $600, depending on the location of the leak and the type of roofing material used. Small shingle leaks usually average $150–$300, while leaks originating under flashing or in valleys might require $350–$600. Catching and repairing leaks quickly prevents secondary damage, making this an essential investment to protect your home’s structural integrity. Addressing leaks promptly minimizes both immediate repair costs and potential interior water damage. How Much Does Asphalt Shingle Repair Cost? Repairing asphalt shingles typically involves replacing damaged shingles, underlayment, and sealant. The average cost runs from $100 to $400 per square (100 sq ft), with minor section replacements starting around $250. Complete replacement of larger asphalt shingle sections can cost up to $1,200, especially for steep or intricate roof areas. Getting accurate estimates depends on the quality of the shingles, the roof’s pitch, and the extent of the section needing replacement. How Can Homeowners Finance Residential Roof Repairs? Financing residential roof repairs can help bridge budget gaps and allow for critical maintenance to be completed without delay. Available options include loans, lines of credit, payment plans, and insurance claims. Each of these solutions comes with its own set of terms, interest rates, and approval processes. Exploring these avenues helps homeowners move forward with necessary repairs without putting them off. What Are the Available Financing Options for Roof Repairs? Secured Home Equity Loans offer attractive low interest rates but require your home as collateral. Unsecured Personal Loans can provide quicker approval but typically come with higher interest rates. Credit Cards are useful for smaller repairs but involve variable interest rates. Contractor Payment Plans allow you to split costs into manageable monthly installments. Choosing the right option involves balancing the overall cost, repayment period, and the speed of approval. How Do Homeowners File Insurance Claims for Roof Repair? Document the damage immediately by taking photos and making detailed notes. Carefully review your policy coverage for wind, hail, or accidental damage. Contact your insurance provider to initiate the claim and get a claim number. Schedule a professional inspection for an official assessment of the damage. Submit repair estimates and the adjuster's report for approval. Following these steps can streamline the claims process and help you maximize your reimbursement. What Should You Know About Roof Repair Warranties? Roof repair warranties generally fall into three main categories: Manufacturer Warranties cover defects in materials for periods ranging from 20 to 50 years. Workmanship Warranties guarantee the quality of the installation for 1 to 10 years. Extended Service Plans offer ongoing inspections and minor maintenance services. Understanding the scope and exclusions of each warranty helps secure long-term protection for your investment. How to Get an Accurate Roof Repair Estimate Accurate estimates provide a clear outline of the project's full scope, including the quality of materials, labor involved, and expected timeframes. Detailed proposals guide homeowners in making informed decisions and help prevent hidden costs. Knowing what to expect in an estimate results in fair pricing and clear communication throughout the process. Why Is It Important to Get Multiple Roof Repair Quotes? Obtaining at least three quotes allows you to: Compare the quality of materials and labor rates offered by different contractors. Identify any outlier pricing that might indicate hidden fees or unnecessary charges. Assess the responsiveness and professionalism of each contractor. Negotiate better terms by leveraging competitive offers. Getting multiple quotes helps you choose the best combination of value and quality for your project. What Should a Detailed Roof Repair Estimate Include? A comprehensive estimate should list: The scope of work, with itemized tasks clearly defined. Specific material details, including brand names. Estimated labor hours, hourly rates, and the size of the crew. The projected timeline for completion, along with key milestones. The payment schedule and terms. Having all these details in writing establishes clear expectations and accountability from both parties. How Can You Get Transparent and Fair Pricing? You can get fair pricing by: Requesting itemized breakdowns for both materials and labor. Verifying that the contractor is properly licensed and insured. Asking for references and recent project photos. Comparing the warranty coverage offered by different providers. Transparency in every estimate helps prevent surprises and builds a foundation of trust. When Should You Repair vs. Replace Your Residential Roof? Deciding between repairing and replacing your roof involves weighing the current repair costs against the overall long-term health of your roof. Minor, isolated issues often make repair the sensible choice, while extensive deterioration typically justifies a full replacement. This comparison helps clarify when investing in a new roof offers better long-term value.  What Factors Indicate If Repair Is a Worthwhile Investment? Repairing your roof is often cost-effective when: The roof is less than 10 years old. The damage is confined to specific, isolated areas. The underlying structure and decking are still in good condition. The material warranties are still active. Carefully assessing these factors can help you avoid unnecessary replacement expenses. How Can Timely Repairs Extend Your Roof’s Lifespan? Addressing issues promptly helps prevent moisture intrusion and rot, thereby preserving the integrity of your roof’s decking and underlayment. Stopping small leaks before they spread can add 5–10 years to your roof’s overall lifespan, ultimately saving you money on future full-replacement costs. Proactive maintenance keeps your roof performing optimally and provides homeowners with peace of mind. Why Choose Total Roof for Your Residential Roof Repair Needs in Atlanta? Total Roof combines local expertise, industry certifications, and a steadfast commitment to delivering lasting results. As a licensed residential roofing contractor serving the Atlanta metro area, Total Roof is dedicated to providing transparent pricing and exceptional workmanship on every project we undertake. What Expertise and Certifications Does Total Roof Offer? Total Roof holds key industry certifications and qualifications: Master Elite certification from leading shingle manufacturers. Advanced training in specialized metal and flat roof repair techniques. Active membership in professional roofing associations. Continuous safety and quality training for all our crews. These credentials guarantee that your repairs are performed by skilled professionals who adhere to all building codes. How Does Total Roof Provide Quality Workmanship and Customer Satisfaction? Total Roof implements rigorous quality control protocols: Detailed pre-repair inspections are conducted to identify all underlying issues. Our licensed and insured crews strictly follow the manufacturer's best practices. Comprehensive warranties cover both materials and labor for your peace of mind. Follow-up inspections are performed to confirm the effectiveness of the repairs. This unwavering dedication to excellence builds trust and long-term customer satisfaction. How Can You Contact Total Roof for a Residential Roof Repair Estimate? To schedule a no-obligation roof repair estimate, please contact Total Roof by phone or email. Our team is ready to respond promptly, assess your needs, discuss financing options, and provide transparent pricing tailored to your home’s specific requirements. Respecting your time and budget, Total Roof makes professional roof repair a straightforward and reliable experience. Get Quality Repair at Total Roof Understanding residential roof repair costs helps you protect your home and make wise budget decisions. By comparing average costs, analyzing the factors that influence pricing, exploring financing options, and choosing an expert contractor like Total Roof, you can approach every repair decision with confidence and keep your home protected by a durable, watertight roof.